

Tools and Materials
Product costs, availability and item numbers may vary online or by market.
Siding Calculator
Use our handy Siding Calculator to determine how much product you need to buy before installation.
Vinyl Siding Installation Tips


Vinyl comes in a variety of grains, thicknesses and colors, making it a practical choice for many homeowners. We'll give you tips on preparing your home, cutting vinyl siding and installing the siding panels.
Check out our Siding Buying Guide for more siding installation tips and inspiration.
Whether you're replacing vinyl siding or installing it for the first time, here's how to get the job done.
Allow for Expansion and Contraction
- Vinyl siding installation must allow for material expansion and contraction caused by weather.
- Cut your siding in lengths with a 1/4-inch gap for expansion wherever siding butts accessories.
- Include a 3/8-inch gap when installing exterior siding in areas with weather below 40 degrees Fahrenheit.
Choose the Right Nails
- Use galvanized stainless steel or aluminum roofing nails with a head diameter of 3/8 inch.
- The nails should measure at least 1-3/4 inches in length, long enough to penetrate into the nailable base at least 3/4 inch.
Don't Drive the Nails Tight
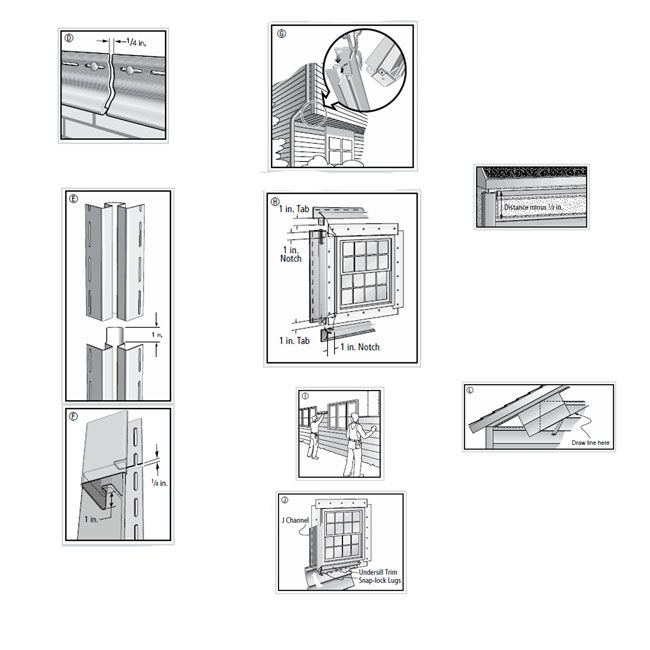
Allow approximately 1/16 inch between the nailhead and vinyl. This will permit expansion and contraction as well as prevent dimpling that causes waves in siding [fig. A].
Center the Nails in the Vinyl Siding Slots
Don't nail to the extreme right or left of nail slots in the siding panels [fig. B].
Keep the Nails Straight and Level
Use your hammer carefully: Crooked nails will distort the siding panels, causing the panels to buckle [fig. C].
Don't Face-Nail
Nailing directly into vinyl siding panels will restrict horizontal movement and cause the panels to buckle.
Never Pull Siding Taut When Nailing
- Pulling the panel taut stretches the panel out of shape and causes an undesirable lap joint.
- Panels should be pushed up from the bottom until full lock contact is made and then you can nail them into place.
Space the Nails Properly
Siding panels should be nailed 12 inches to 16 inches on-center.
Vinyl Siding Cutting Methods
Aviation and Tin Snips
Start cutting with your tin snips at the top interlock and continue toward the bottom of the panel.
Utility Knife
Score the panel with a utility knife and then bend the vinyl back and forth until it snaps cleanly on the scored line.
Power Saw, Table Saw or Miter Saw
Surface Preparation for Vinyl Siding Installation
- Securely nail all loose boards and wood trim and replace any rotten boards.
- Scrape away old caulking around windows and doors. The buildup of old caulking interferes with the positioning of new trim for the siding.
- Remove downspouts, lighting fixtures and moulding where they'll interfere with the exterior siding installation.
- The windowsill extensions may be cut off so new trim can be installed flush with the window casing.
- Tie back shrubbery and trees where they're close to the wall. This will give you more room to work and help you avoid damaging the landscaping.
Use Exterior Siding Furring
In new construction, furring strips aren't usually necessary. However, older homes often have uneven walls. These walls should be furred out to prevent a wavy appearance in the finished vinyl siding job.
Over Wood Subsurface
Lath strips are the most commonly used for furring over a wood surface.
Over Masonry Subsurface
When furring over masonry, install 1-inch-by-3-inch wood with masonry nails over the masonry area to be sided.
On Horizontal Siding
- Strips should be installed vertically on 12-inch to 16-inch centers.
- Furring should be installed completely around doors, windows and other openings, at all corners and at the top and bottom of the area to be sided.
With Vertical Siding
- Furring vertical siding uses the same method as for horizontal siding.
- Strips should be nailed horizontally to materials, like structural lumber, on 12-inch to 16-inch centers.
Furred Existing Siding
- Furred existing siding should be covered with sheet insulation.
- The spaces between the furring strips should be filled in with sheet insulation equal in thickness to the furring strips.
- This will provide an even wall surface for the siding and help avoid any waviness.
Insulation for Vinyl Siding
House wrap or foam board insulation helps insulate and level out the exterior of a house. Some manufacturers strongly caution against the use of drop-in type foam or fiberboard behind their vinyl siding. This type of insulation may change and flatten the contour of the panel, causing the siding to bulge or ripple.
Instructions
Vinyl Soffit and Fascia Installation Guide
Use the following instructions for vinyl soffit and fascia installation.
Open Eave Installation
For open overhangs, use vinyl siding F-trim that's nailed to the wall of the house. Use a level to make pencil marks parallel with the lower edge of the wood fascia board at the end of each wall. These are for reference points. From these marks, measure up 7/8 inch and strike a chalk line.
Along this line, install the F-trim with its top leg on the chalk line. This step is important since the F-trim or J-channel forms the back support for the soffit panel. Intermediate nailing supports should be installed on eaves over 16 inches wide.
Closed Eave Installation
Install 1/2-inch J-channels on the inside wall and behind the fascia board [fig. M]. Measure the distance between the 1/2-inch J-channels from one back edge to another. Then cut the soffit panels according to these dimensions, allowing 1/4-inch clearance for contraction and expansion. On panels longer than 36 inches, leave 1/4 inch on each end and use solid panels.
For areas needing ventilation, use perforated soffit. After cutting the panels to the desired length, insert the end into the supporting J-channel or F-trim. Line the panel up correctly and nail the panel to the existing soffit through the nailing hem.
After the first panel is installed, insert the locking leg of the second panel into the installed panel, covering the nailing hem. Fit the panels together snugly to protect against shifting. Intermediate nailing supports are necessary for panels wider than 16 inches.
How to Turn Corners Using Vinyl Siding
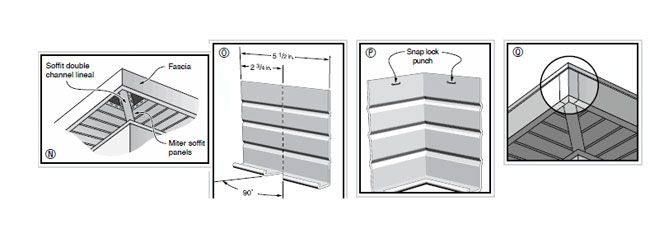
When turning corners, it may be necessary to miter the soffit panel to the proper angle. Use two 1/2-inch J-channels back-to-back to create additional support for the panels [fig. N].
How to Close the Soffit Ends
Use 1/2-inch J-channels cut to length and installed with nails into the overhang. Fit them into the F-trim and J-channel supporting soffit panel. When using both soffit and fascia, install a frieze runner (F-trim) on the bottom of the fascia board and then complete the soffit installation.
Prepare for installing the fascia panels by applying an under-sill vinyl siding trim along the top of the fascia board. Hook the bottom lock of the fascia panel over the F-trim that's installed on the bottom of the fascia board. Then insert the top edge of the fascia into the under-sill trim.
Use a snap lock punch tool on the fascia panel to punch out raised slots every 6 inches to hold the fascia in place. For proper fit and to avoid waviness, run the F-trim and under-sill trim straight. We recommend using a chalk line to achieve the right fit.
To make the corner cap, cut a piece of fascia 5-1/2 inches in length. Mark the vertical centerline on the back cut. Cut out a 90-degree section of the bottom flange from the center, leaving 45 degrees on each side. Using a hand-seamer metal ruler, fold along the vertical centerline to form a right angle corner. Punch the top edge of the corner cap with your snap lock punch tool. The corner cap is then hooked onto the bottom ends of the fascia, and the top is snapped into place in the under-sill trim [figs. O, P, Q]. Be sure you don't face-nail vinyl fascia panels.
These instructions are only intended to provide general installation guidelines. Check with local building codes for any additional requirements regarding wall preparation and vinyl siding installation.