
1. Choose a Range Hood Based on Need, Not Looks
Rolling up your sleeves and DIYing a range hood cover gives you a lot of flexibility and might even save you a few dollars. Choose the right size and decide whether you need a ductless range hood, ducted or a convertible range hood. But from there, choose the best priced kitchen vent hood because the looks and finish won’t matter if you build around it.


2. Choose a Range Hood With Underside Controls


Try not to get too swept away with inspiration images that you forget the practical elements of the stove hood build. Customizing your range hood usually means covering up the top and sides, so choosing a unit with underside controls keeps the design functional as well. You’ll have easy access to all the necessary switches, filters and lighting when it’s time to replace certain components.
3. Create a Stable Foundation for Your Range Hood

To create your custom range hood, you’re going to want to give your decorative finishes a stable base. Use 1x4 lumber with screws to form a rectangular box, attached to the ceiling joists and studs in the wall, around the installed kitchen vent hood. Face the frame with plywood for added stability. If you’re going to use a heavier finish like stacked tile or stone, use cement board underneath.
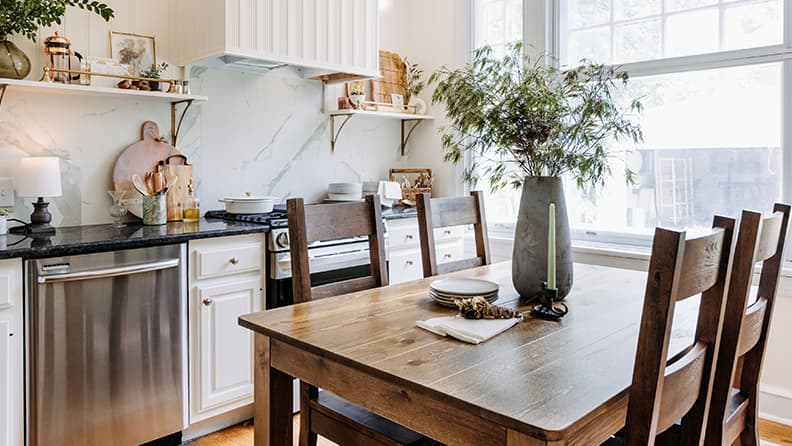
4. Choose Your Range Hood Style

If you’re feeling stumped about the shape or style of your DIY range hood cover, look around your kitchen to get inspired. You want the decorative part of the hood to feel like it fits in, so see what colors, textures and shapes exist already in your kitchen. Look at the existing moulding, the shapes of the cabinets and the cabinet faces to guide you in the trim you’re using as the decorative facing. Here, the fluted trim serves as inspiration for a fluted range hood cover. Choose a unique moulding to create a custom feel, just take a walk through our moulding aisle to get some inspo.
You can also choose between making a hooded vent feel like a seamless part of the design or making it stand out. A beautiful, patterned tile, colorful paint or stonework all work to turn your stove and range hood into the focal point of your kitchen. If you want to add more drama, change the shape. An arch creates plenty of visual interest and softens a room full of cabinets.
5. Finish Your Range Hood
Add crown moulding to the top edge that meets the ceiling of your wall mount range hood. It gives the entire DIY a more polished and complete look. Attaching the top of this custom range hood serves dual purposes. Sending it up to the ceiling creates an optical illusion of higher ceiling heights. From a practical angle, not leaving a space between the ceiling and top of the custom range hood, keeps dust and debris from collecting in a place that’s hard to clean.
A range hood is more than just a fan for kitchen exhaust — it’s a way to add style and personality to your kitchen.