
Backyard Bowling Alley


Our first idea is to build a Halloween-themed bowling alley in the backyard. For this, you’ll need some bales of hay or pine straw, something to act as a bowling ball, and pins. First, set up your bales in a U shape to create the sides and back of the bowling area. Make the pins by filling old bottles with colored water or use some tombstone decorations. As long as it’ll stand upright until hit, whatever you choose will work great. For the bowling ball, you can decorate a basketball to create a jack-o’-lantern ball. You can also decorate the sides of your bowling alley with some light-up pumpkins for extra Halloween ambiance.
Chicken Wire Ghosts

Chicken wire is great for all types of projects because it’s so good at holding its shape, which makes it the perfect choice for creating some hanging ghosts for your haunted backyard. To make your own, take some chicken wire and form it over a bucket, box or other object to create a ghost shape. Use snips to cut a small piece of wire for a hanging loop and attach it to the top. Next, cut a piece of fabric to be larger than your wire shape and cut a small slit in the center for the loop to fit through. Now you’ve got a simple, hangable ghost that you can shape however you want. Draw on a face to finish the job.
Chicken wire can be sharp. Make sure you’re careful and wear gloves when cutting it. If you have a lot of cut edges, line them with painters tape to make sure they don’t poke anyone.
Brain Toss Target Game

Our next activity is a little gross but a lot of fun. It’s a target practice game in which kids can reach into a bucket of squishy sponges and toss them at a bull’s-eye. For this you’ll need some sponges, plywood, 2-by-4s, some hardware, a jigsaw, a drill and paint. We found some textured sponges that look like brains and created an open-mouth ghost target.
For the target, start with a project board and mark a hole in the center. Use a drill to create a starting spot and then use a jigsaw to carefully cut out the hole. Drill three pilot holes along the top edge of the project board and then attach a 2-by-4 to that edge by screwing it into the pilot holes. You can use more pieces of 2-by-4s to create the legs. Line up the legs the way you want them and then screw it all together.
We decided to keep our target upright, but you could lean it back more for a slightly easier game. You can paint a classic bull’s-eye target around the hole or make it extra seasonal by painting a ghost or pumpkin mouth on the board. Place your sponges in a bucket of water, and you’re ready to play.
Tunnel of Terror
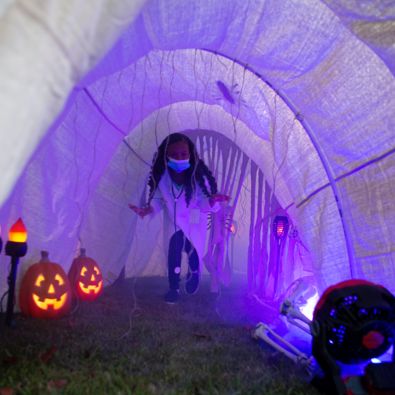
Our last project is a tunnel of terror. This is a project in which you can really let your creativity shine. You can use our instructions to create a basic tunnel structure and then decorate it however you like. You’ll need flexible PVC pipes to help build a series of arches. Begin by driving rebar into the ground to hold the PVC pipes and then bend them into an arch shape. Drape a large canvas drop cloth over the hoops to create a spooky look for your tunnel. Poke holes in the drop cloth and attach it to the pipes with some twine.
After you’ve completed your tunnel, it’s time to decorate. You can set the mood by placing a Bluetooth speaker inside to play Halloween sound effects and songs, hanging some string from the ceiling to tickle the kids’ faces, and even adding a fog machine if you want to go all out. Glowing pumpkins are always a hit as well. Adding a fan and motion-activated lighting adds some dramatic nighttime effects.
You can also play lots of fun games in the tunnel. You can hide candy for the kids to find or cut holes in the sides and let the kids put their hands in to scare each other. Once you have all the elements your kids need to have a fun, haunted Halloween adventure, the only limit is your imagination.