
Planning Your Outdoor Kitchen
Who can resist the aroma of food cooking on the grill as it wafts through the neighborhood? Grilling out is a favorite pastime for many, and you can step up your game by creating an outdoor kitchen in your backyard.
When you’re ready to turn your backyard into an outdoor haven, there are several factors to consider when planning your outdoor kitchen. How much space do you have? How do you want to lay out the kitchen? Consider your entire backyard and how much of that space you want to devote to a kitchen. Mock up your plans to get a general idea of how you want the outdoor kitchen to look like along with the appliances.
Another thing to consider is the budget. Your budget should include not only the amount you’re willing to spend on the components for your kitchen, but also the costs, if any, of running utilities and plumbing to your kitchen, as well as permits and labor. If your desired kitchen is on the larger size, it might be a good idea to have a dedicated electrical circuit with required ground fault circuit interrupter (GFCI) outlets. Whether you want a fully functional kitchen or a simple grill with just a few added amenities, your first step is planning.
Check with local officials and/or your homeowners association to see if any building codes or permits are required, especially if you're running electrical, gas or plumbing lines. Always contact a licensed contractor to connect any electrical, water, natural gas or propane work.
Location, Location, Location
The size of your outdoor kitchen will depend in part on its location. Placing it along a wall of the house or on the patio is convenient and will grant easy access to the house. However, always place any grill, cooking surface, etc., at least 10 feet away from the home in case of a fire. You can also have existing fuel and plumbing lines connected more easily if the outdoor kitchen is closer to the home.
Placing the kitchen farther away from the house gives you the ability to be more creative and flexible with the configuration and creates a stand-alone setting that feels more intimate. One of the downsides is that having existing plumbing, electrical and fuel lines connected to your kitchen will be a bit more difficult. You’ll also need to consider shading from the elements, which may necessitate the need to build a structure. Take a look at the requirements for any cooking appliances, however. They may not be compatible with an overhead structure.
Always keep a fire extinguisher nearby in case of emergency.
Measure the Space
Once you’ve selected a location for the outdoor kitchen, measure the area to determine how much space you have to work with. The available space factors into your kitchen configuration, as do the kitchen zones (discussed below). Keep in mind the amenities you want for your kitchen and seating. The space dimensions will ultimately guide your design so plan carefully. It’s a good idea to create a blueprint of your desired kitchen design to visually keep you on track.
Outdoor Kitchen Configuration
With space in mind, it’s time to think about the layout of your outdoor kitchen. There’s no one right way to create an outdoor kitchen. Your kitchen configuration depends on the amount of space you have, your budget and your design preferences. Below are typical kitchen configurations to consider.
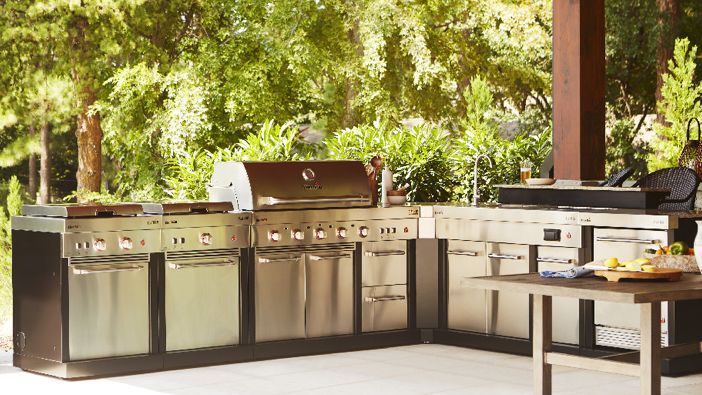
- L-Shaped: This classic, popular shape works well for small and medium spaces, fits perfectly in corners, and allows for open space.
- Linear: An option for small spaces and small budgets, this layout usually runs along the side of the house and features counter space on either side of the grill. If it won’t work along the side of your home, it can also be freestanding.
- Galley: Appliances and cabinets face each other along a rectangular line divided by a central walkway.
- U-Shaped: This layout works great for freestanding kitchens. It’s a versatile layout that’s lined with appliances and cabinets on three sides, forming a U shape, with an open space in the center. This configuration works well in large outdoor kitchens and offers more countertop space for preparing food and drinks.
Outdoor Kitchen Zones
You not only want your outdoor kitchen to look great, but it should be efficient as well. Much like an indoor kitchen, an outdoor kitchen benefits from different work areas that facilitate a natural flow between each area. These work areas, or zones, have a specific function and can make the outdoor kitchen run more smoothly.
Modular outdoor kitchen components are semicustomizable. They give you the freedom to create your outdoor kitchen using a variety of sections that can be arranged in different layouts.
Prep Zone


No matter what type of meal you’re planning, the process runs more smoothly when you have adequate prep space. If your outdoor kitchen is close enough to your indoor kitchen, you may not need a huge prep area and can devote some of that outdoor space to other bells and whistles. Regardless, ample counter space is a must. You should also consider installing a sink to help with prep, cleaning and to cut down on cross-contamination when working with raw food.
Other useful items to have on hand in the prep station include cutting boards, paper towels, roasting racks, grilling and cooking utensils, and a slide-out trash bin. If you decide to have a fridge for raw meats in the prep space, it’s a good idea to have a separate fridge in the entertainment zone for drinks and other food items.
Cooking Zone

The cooking zone is the visual centerpiece of the outdoor kitchen. It’s also where all the magic happens. The cooking island is the hot zone where the grill, smoker, pizza oven, cooktop, warming trays, side burners, etc., go. A gas grill is the most popular grill in an outdoor kitchen. Ventilation is also important, so pay attention to the space above, below and around the grill, and be mindful of where the smoke vents. Don’t forego storage space for things like a propane tank, if you’re using a gas grill, and grilling accessories. This zone is also where you’ll keep the accessories for grilling and cooking, such as spatulas, tongs, a burger press, a meat thermometer, etc.
For help choosing a grill, read our Grill and Smoker Buying Guide. If you’re specifically looking for a pellet grill or smoker, check out our Pellet Grill and Pellet Smoker Buying Guide.
If your outdoor kitchen is close to the house, ensure that the cooking zone has proper ventilation. Place the grill or any cooking surface at least 10 feet away from any combustible materials, such as deck rails, tree branches, bushes, wood siding, etc. Check product information for proper spacing.
Plating and Serving Zone
The plating and serving zone should have ample counterspace and elbow room. It’s the perfect place for food that’s been grilled and is ready to serve. For food that won’t be served right away, warming drawers can keep it at a desired temperature until it’s ready to be served. This zone is also a good place to store garnishes, condiments, utensils, paper towels, napkins and perhaps a pull-out trash can.
Entertainment Zone
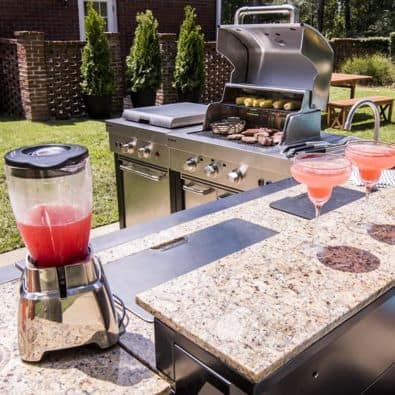
When it’s time for socializing, the entertainment zone is the place to have a good time. Make sure it’s well out of the way of the prep and cooking zone so that collisions in those spaces are kept to a minimum.
To minimize trips back and forth to the house, a beverage refrigerator or a keg is a great option for beer, wine and other drinks. A patio bar is also an option where you can stock up on libations, fancy glasses, etc. Your entertainment zone is limited only by your imagination.
Outdoor Décor

The beauty of your outdoor kitchen is further enhanced when you create a symbiotic environment that brings together dining and entertaining. Whether your style is rustic or contemporary, choose patio furniture that's comfortable and inviting, and something that’s great for both conversing and dining. If your dining and entertaining area is uncovered and exposed to the elements, look for furniture that's durable and weatherproof.
It’s recommended that you provide some type of protection for your outdoor kitchen, like a pergola, retractable roof or canopy to weatherproof your space and keep everyone comfortable.
Alfresco dining is a favorite warm-weather treat. But if you’re in a cooler climate or when the weather turns, extend the season with a patio heater or incorporate a fire pit as the focal point of the entertainment area. Don’t forget outdoor lighting to set the perfect mood and complement the space when the sun goes down.
For ideas and inspiration, see our Patio Furniture Buying Guide and Outdoor Lighting Buying Guide. If you’re in a DIY mood, read Outdoor Kitchen With Concrete Countertop to build your own.
DIY or Prebuilt Modular?
When building an outdoor kitchen, you have a couple of options: building a do-it-yourself (DIY) outdoor kitchen or assembling a prebuilt, modular outdoor kitchen. Each type has its advantages.
DIY Outdoor Kitchen
This is a large project suitable for someone with advanced DIY knowledge and experience. You’ll need to frame the kitchen, install cladding to give it a finished look, and add a countertop or work surface. You’ll also need to install appliances and fixtures so that they can be hooked up to gas, power, water lines and drain lines. The project will take several days. However, the effort and time has some benefits:
- You can build the kitchen to fit your needs and space exactly.
- You can customize everything: the look, shape, size, countertop, appliances, fixtures and more.
Modular Outdoor Kitchen

Assembling and installing a prebuilt modular kitchen lets you start cooking outdoors with less time and effort. While a modular kitchen doesn’t offer as much customization as a DIY option, you can get variety with different available modules. A modular kitchen doesn’t require as much DIY experience or the same variety of tools. A modular option:
- Comes with instructions
- Can often be completed in a day or two with some basic assembly knowledge and a basic set of tools
- Offers pieces designed to fit together with correct clearances for fixtures and appliances
- May offer expansion options and simple disassembly so you can take everything with you if you move
Modular components can be heavy. Make sure you have a helper available.
Modular kitchen components often have an anchoring system, so you may need a concrete wall or floor to install them properly.
Plan the Project
Before building or purchasing your kitchen, think about the appliances and fixtures you want to include. Do you just want a grill, a drink cooler and some preparation space? Or do you want to add more options, such as a pizza oven, side burner, sink and storage cabinets? Make sure you have a plan to have a licensed professional connect everything to power, gas, water and drain lines. Here are some things to consider:
- Make sure you have a level surface that can support the weight of components.
- Cooking and refrigeration appliances need clearance around and above them and also need a location with good airflow.
- Draw your outdoor kitchen plan to scale on graph paper. Plan placement for counters, cabinets, appliances, fixtures and features.
- Make sure your planned kitchen will fit in your available area, with enough workspace and gathering space around each piece.
- Map the space out so everything is positioned for easy access to the power, gas, water and drain lines you’ll need to have placed. Note that for a kitchen made from wood or other combustible materials, you’ll need to plan for a freestanding grill with proper spacing from combustible elements. Outdoor grills aren’t suitable to be built into combustible materials.
- Add any seating or dining areas you plan to include.
- Note decorative touches you want to add, such as landscape lighting, fountains, etc.
Building a DIY Outdoor Kitchen
While the variety of customization options means that every DIY outdoor kitchen will be different, there are some common things you’ll need to plan for when you take on this project.
DIY Kitchen Essentials
The most common tools needed for this project include:
- Drill/driver and bits
- Circular saw or miter saw and blades
- Tape measure
- Long level
- Square
- Caulk gun
- Saw horses
- Safety gear, including work gloves, eye protection, hearing protection and a respirator
You’ll also need:
- Pressure-treated boards
- Exterior-rated plywood
- Deck screws
- Mortar
- Construction adhesive
- An outdoor-rated countertop
- Outdoor-rated tile, stone veneer, etc., for decorative cladding
Of course, your tools and materials will vary. For example, you may need grout and the appropriate tile tools if you’re tiling your kitchen. Or you may need lath — a support structure for mortar — to clad your kitchen with stone veneer.
For step-by-step instructions for a couple of different takes on outdoor cooking spaces, see our DIY outdoor kitchen how-to guide and our instructions for building a grilling island.
Building the DIY Kitchen
In most cases, you’ll start by building the frame from pressure-treated 2-inch-by-4-inch boards assembled with deck screws. Other options include cedar wood or concrete block.
Kitchen Construction Basics
Assembling a Modular Kitchen
Installation, tools, materials and sequence will vary by components, manufacturer and configuration, so follow the step-by-step kitchen installation steps for your specific modules. However, there are some general considerations and concepts most modular kitchens share.
Modular Kitchen Essentials
In general, you’ll need:
- Drill/driver and bits
- Assorted wrenches
- Ratchet and socket set
- Screwdrivers
- Tape measure
- Level
- Square
- Clamps
Many kits come with the hardware necessary for assembly, but for some kits you may need:
You’ll need to ensure cooking appliances get adequate airflow to function correctly, with proper clearance around and above the appliances. Some appliances may require an insulated metal jacket. For appliances that run on natural gas or propane, the cabinets should include venting.
Installing the Modular Components
Installing a Built-In Gas Grill

Built-in grills will require some assembly, including attachment of connections for accessories, such as an ignitor or a rotisserie. Install the grill in the assembled cabinet according to your instructions. Keep the grill level and make sure there’s room for a gas line and any power connections. You may need to install the grill in an insulated jacket to protect the cabinet from heat. If the grill will be fueled from a propane tank, you’ll need to install a base to secure the tank. Install vents in the cabinet according to instructions.
Installing an Outdoor Pizza Oven

An outdoor pizza oven will need a noncombustible stand, cabinet or shelf. You can purchase the oven separately as a tabletop model or as part of a modular cabinet. For modular outdoor pizza ovens, you’ll need to assemble the cabinet or shelf and the oven itself. Wood-fired pizza ovens will have a wood storage area you’ll need to assemble. For gas-fueled models, make sure there’s easy access to have the gas line connected. Attach the oven chimney and cap. Attach the ash box and add the cooking stones or fire/refractory brick inserts. Finally, install the oven door and attach any included side tables or accessory hooks.
Installing an Outdoor Sink
Assemble the outdoor sink and install it in the cabinet. Depending on the kit you’re using, you may need to create a cutout in the countertop or work surface. You’ll need to install the drain assembly and faucet and have them connected to water and drain lines. For bar cabinets, you may also need to install features such as ice trays, a trash bin, etc.
Your outdoor sink cabinet should include full installation information, but take a look at our kitchen sink installation and faucet installation how-to guides to get familiar with the type of work you’ll need to do for this project.